1 qt的选择与下载

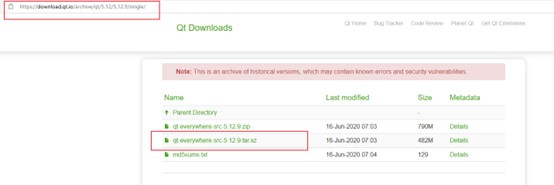
在学习IMX6ULL时,ubuntu中安装的QT版本是5.12.9,因此这里我选择了此版本。

下载并解压:

1
2
3
cd /opt
wget http://download.qt.io/archive/qt/5.12/5.12.9/single/qt-everywhere-src-5.12.9.tar.xz
tar xf qt-everywhere-src-5.12.9.tar.xz

2 创建海思的qmake.conf

1
2
cp /opt/qt-everywhere-src-5.12.9/qtbase/mkspecs/linux-arm-gnueabi-g++/ /opt/qt-everywhere-src-5.12.9/qtbase/mkspecs/arm-himix200-linux-g++ -rf
vi /opt/qt-everywhere-src-5.12.9/qtbase/mkspecs/arm-himix200-linux-g++/qmake.conf

qmake.conf内容修改如下:

1
2
3
4
5
6
7
8
9
10
11
12
13
14
15
16
17
18
19
20
21
22
23
24
25
26
27
28
#
# qmake configuration for building with arm-linux-gnueabi-g++
#

MAKEFILE_GENERATOR = UNIX
CONFIG += incremental
QMAKE_INCREMENTAL_STYLE = sublib

include(../common/linux.conf)
include(../common/gcc-base-unix.conf)
include(../common/g++-unix.conf)

# modifications to g++.conf
QMAKE_CC = arm-himix200-linux-gcc
QMAKE_CXX = arm-himix200-linux-g++
QMAKE_LINK = arm-himix200-linux-g++
QMAKE_LINK_SHLIB = arm-himix200-linux-g++

# modifications to linux.conf
QMAKE_AR = arm-himix200-linux-ar cqs
QMAKE_OBJCOPY = arm-himix200-linux-objcopy
QMAKE_STRIP = arm-himix200-linux-strip

load(qt_config)

# modifications to gcc-base.conf
QMAKE_CFLAGS_RELEASE += -mcpu=cortex-a7 -mfloat-abi=softfp -mfpu=neon-vfpv4
QMAKE_CXXFLAGS_RELEASE += -mcpu=cortex-a7 -mfloat-abi=softfp -mfpu=neon-vfpv4 -fpermissive

3 创建configure配置参数

在qt-everywhere-src-5.12.9目录中创建autoConfig.sh文件,填写以下内容:

1
2
3
4
5
6
7
8
9
10
11
12
13
14
15
16
17
18
19
20
21
22
23
24
25
26
27
28
29
30
31
32
33
34
35
36
37
38
39
40
41
42
43
44
45
46
47
48
49
50
51
#!/bin/sh
./configure \
-prefix /opt/Qt-5.12.9-hi3516dv300/ \
-opensource \
-confirm-license \
-release \
-strip \
-no-eglfs -linuxfb \
-qt-zlib \
-no-gif \
-qt-libpng \
-qt-libjpeg \
-qt-freetype \
-no-rpath \
-no-pch \
-no-avx \
-no-openssl \
-no-cups \
-no-dbus \
-no-pkg-config \
-no-glib \
-no-iconv \
-xplatform arm-himix200-linux-g++ \
-no-opengl \
-nomake examples \
-nomake tools \
-no-sqlite \
-skip qtgamepad \
-skip qtandroidextras \
-skip qtmacextras \
-skip qtx11extras \
-skip qtsensors \
-skip qtserialbus \
-skip qtserialport \
-skip qtwebengine \
-skip qtwebchannel \
-skip qtwebsockets \
-skip qtlocation \
-skip qtquickcontrols \
-skip qtpurchasing \
-skip qtconnectivity \
-skip qtscxml \
-skip qtxmlpatterns \
-skip qtnetworkauth \
-skip qtspeech \
-skip qtscript \
-skip qtremoteobjects \
-skip qtcharts \
-skip qtdatavis3d \
-skip qtwebview
exit

保存后退出。
其中:

  • -prefix是make install命令执行时,安装的目录;
  • -xplatform对应的是前面qmake.conf文件的目录;
  • -make libs表示编译成动态链接库,需要手动把so库文件复制到开发板上;删除了很多不需要的库,也没有编译示例程序、工具和测试程序,这会加快编译速度。

4 编译

在qt-everywhere-src-5.12.9目录中执行以下命令,自动生成Makefile文件:

1
2
chmod +x autoConfig.sh
./autoConfig.sh

执行成功后,进行编译:

1
make –j4

编译的时间大概10多分钟,与计算机配置有关。
编译完成后,执行安装命令:

1
sudo make install

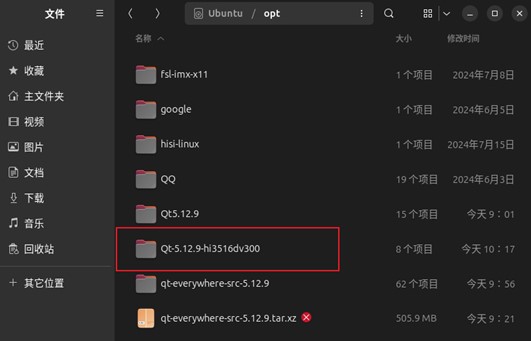
由于在autoConfig.sh文件中已经指定了安装路径,所以将自动安装到/opt/Qt-5.12.9-hi3516dv300目录下。

5 QtCreator的设置

启动QtCreator,打开“工具——>选项——>Kits”构建套件设置页面。
首先其换到“Qt Version”,添加qmake,路径为:

1
/opt/Qt-5.12.9-hi3516dv300/bin/qmake

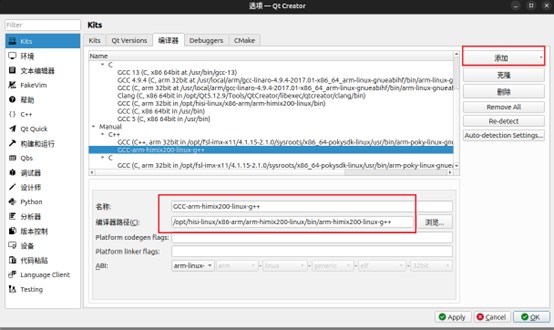
切换到编译器,添加C++和C编译器,其中C++编译器为:

1
/opt/hisi-linux/x86-arm/arm-himix200-linux/bin/arm-himix200-linux-g++
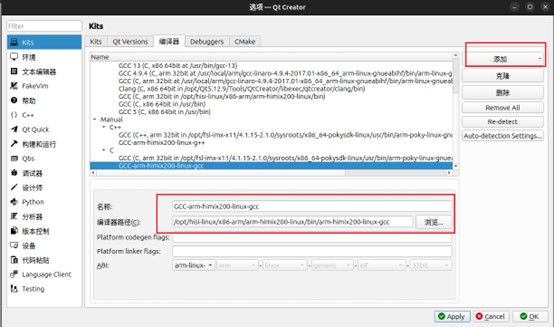
C编译器为:

1
/opt/hisi-linux/x86-arm/arm-himix200-linux/bin/arm-himix200-linux-gcc

最后,添加构建套件,选择刚才设置的Qt Version、编译器。

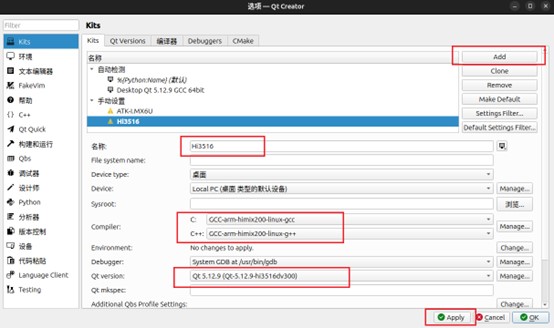
至此,QtCreator的基本设置完成。

6 出现的问题

在编译时如果ubuntu版本过高可能会出现一下问题:

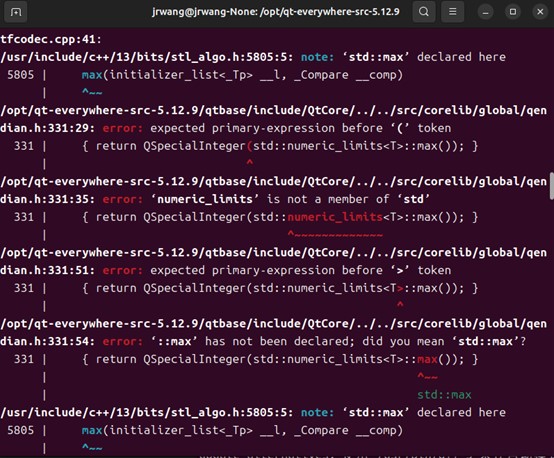
原因是23.10的ubuntu的默认g++版本过高,可以降级到5.4.0版本。

下面开始操作:

编辑软件源文件:

1
sudo vim /etc/apt/sources.list

在最后添加一行:这是一个ubuntu16.04的软件源地址里面有gcc和g++等软件

1
deb https://mirrors.aliyun.com/ubuntu/ xenial main universe

更新软件源:

1
sudo apt-get update

注意,有时update时会报错, 提示GPG error缺少公钥,多见于添加了xenial版本(Ubuntu16)源 此时,解决办法根据报错信息“NO_PUBKEY 40976EAF437D05B5 NO_PUBKEY 3B4FE6ACC0B21F32”导入对应公钥即可。如果没遇到这个问题,就跳过这一步。

1
2
sudo apt-key adv --keyserver keyserver.ubuntu.com --recv-keys 40976EAF437D05B5
sudo apt-key adv --keyserver keyserver.ubuntu.com --recv-keys 3B4FE6ACC0B21F32

更新完以后就可以安装g++5了,不用指定5.4.0,会自动安装5.4.0

1
sudo apt install g++-5

提升g++5的优先级

1
update-alternatives  --install /usr/bin/g++ g++ /usr/bin/g++-5 50

现在再尝试执行autoConfig.sh脚本生成Makefile,就没有问题了。

参考文章:

https://blog.csdn.net/cocoron/article/details/105662856?spm=1001.2014.3001.5502

https://blog.csdn.net/take_it/article/details/106164497