例如:
人可以作为对象,属性有姓名、年龄、身高、体重…,行为有走、跑、跳、吃饭、唱歌…
车也可以作为对象,属性有轮胎、方向盘、车灯…,行为有载人、放音乐、放空调…
具有相同性质的对象 ,我们可以抽象称为类 ,人属于人类,车属于车类。
1 封装 1.1 封装的意义 封装是C++面向对象三大特性之一。
封装的意义:
将属性和行为作为一个整体,表现生活中的事物。
将属性和行为加以权限控制。
封装意义一:
在设计类的时候,属性和行为写在一起,表现事物
语法: class 类名{ 访问权限: 属性 / 行为 };
示例1: 设计一个圆类,求圆的周长。
示例代码:
1 2 3 4 5 6 7 8 9 10 11 12 13 14 15 16 17 18 19 20 21 22 23 24 25 26 27 28 29 30 31 32 33 34 35 36 37 38 39 40 41 #include <iostream> using namespace std;const double PI = 3.14 ;class Circle { public : int m_r; double calculateZC () { return 2 * PI * m_r; } }; int main () Circle c1; c1.m_r = 10 ; cout << "圆的周长为: " << c1.calculateZC () << endl; system ("pause" ); return 0 ; }
示例2: 设计一个学生类,属性有姓名和学号,可以给姓名和学号赋值,可以显示学生的姓名和学号。
示例2代码:
1 2 3 4 5 6 7 8 9 10 11 12 13 14 15 16 17 18 19 20 21 22 23 24 25 26 27 28 29 30 31 #include <iostream> using namespace std;class Student {public : void setName (string name) m_name = name; } void setID (int id) m_id = id; } void showStudent () cout << "name:" << m_name << " ID:" << m_id << endl; } public : string m_name; int m_id; }; int main () Student stu; stu.setName ("小w" ); stu.setID (100 ); stu.showStudent (); system ("pause" ); return 0 ; }
输出:
封装意义二:
类在设计时,可以把属性和行为放在不同的权限 下,加以控制。
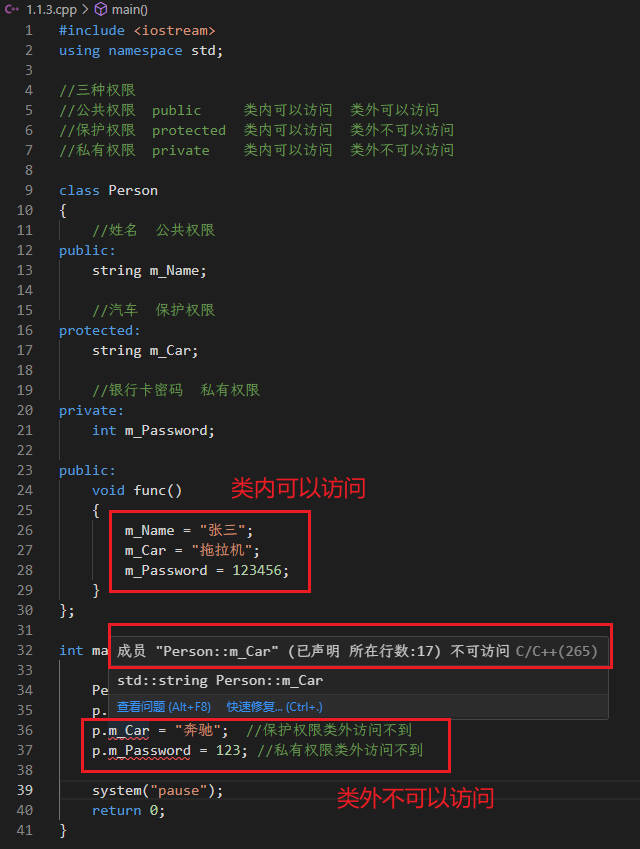
访问权限有三种:
public 公共权限 成员 类内可以访问 类外可以访问
protected 保护权限 成员 类内可以访问 类外不可以访问 子类可以访问父类中的保护内容
private 私有权限 成员 类内可以访问 类外不可以访问 子类不可以访问父类中的私有内容
示例:
1 2 3 4 5 6 7 8 9 10 11 12 13 14 15 16 17 18 19 20 21 22 23 24 25 26 27 28 29 30 31 32 33 34 35 36 37 38 39 40 41 #include <iostream> using namespace std;class Person { public : string m_Name; protected : string m_Car; private : int m_Password; public : void func () { m_Name = "张三" ; m_Car = "拖拉机" ; m_Password = 123456 ; } }; int main () Person p; p.m_Name = "李四" ; system ("pause" ); return 0 ; }
输出:
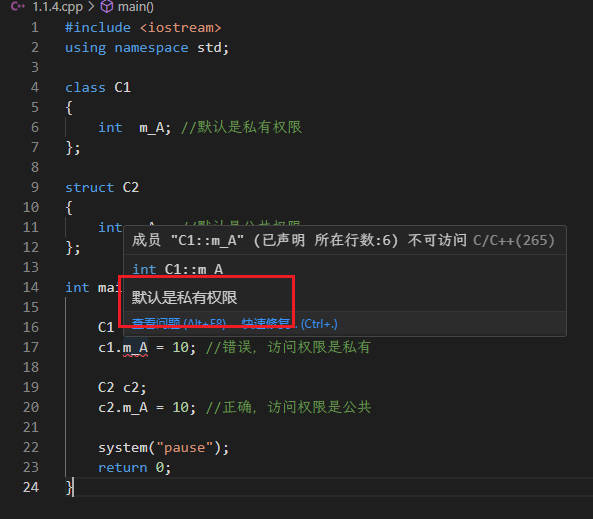
1.2 struct和class区别 在C++中 struct和class唯一的区别 就在于 默认的访问权限不同 。
区别:
struct 默认权限为公共。
class 默认权限为私有。
示例:
1 2 3 4 5 6 7 8 9 10 11 12 13 14 15 16 17 18 19 20 21 22 23 24 #include <iostream> using namespace std;class C1 { int m_A; }; struct C2 { int m_A; }; int main () C1 c1; c1.m_A = 10 ; C2 c2; c2.m_A = 10 ; system ("pause" ); return 0 ; }
输出:
1.3 成员属性设置为私有 优点1: 将所有成员属性设置为私有,可以自己控制读写权限。
优点2: 对于写权限,我们可以检测数据的有效性。
示例:
1 2 3 4 5 6 7 8 9 10 11 12 13 14 15 16 17 18 19 20 21 22 23 24 25 26 27 28 29 30 31 32 33 34 35 36 37 38 39 40 41 42 43 44 45 46 47 48 49 50 51 52 53 54 55 56 57 58 59 60 #include <iostream> using namespace std;class Person {public : void setName (string name) m_Name = name; } string getName () { return m_Name; } int getAge () return m_Age; } void setAge (int age) if (age < 0 || age > 150 ) { cout << "你个老妖精!" << endl; return ; } m_Age = age; } void setIdol (string idol) m_Idol = idol; } private : string m_Name; int m_Age; string m_Idol; }; int main () Person p; p.setName ("张三" ); cout << "姓名: " << p.getName () << endl; p.setAge (50 ); cout << "年龄: " << p.getAge () << endl; p.setIdol ("小明" ); system ("pause" ); return 0 ; }
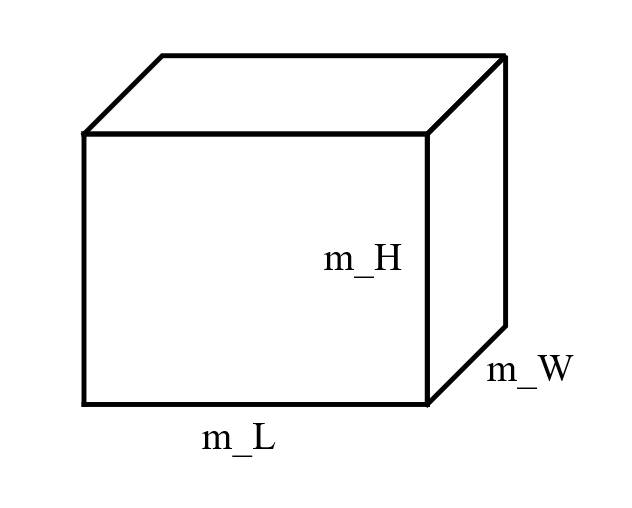
练习:设计长方体类
设计长方体类(Cube)。
求出长方体的面积和体积。
分别用全局函数和成员函数判断两个长方体是否相等。
1 2 3 4 5 6 7 8 9 10 11 12 13 14 15 16 17 18 19 20 21 22 23 24 25 26 27 28 29 30 31 32 33 34 35 36 37 38 39 40 41 42 43 44 45 46 47 48 49 50 51 52 53 54 55 56 57 58 59 60 61 62 63 64 65 66 67 68 69 70 71 72 73 74 75 76 77 78 79 80 81 82 83 84 85 86 87 88 89 90 91 92 #include <iostream> using namespace std;class Cube {public : void setL (int L) m_L = L; } int getL () return m_L; } void setW (int W) m_W = W; } int getW () return m_W; } void setH (int H) m_H = H; } int getH () return m_H; } int getArea () return 2 * (m_L * m_W + m_L * m_H + m_W * m_H); } int getVolume () return m_L * m_W * m_H; } bool isEqualByClass (Cube& cube) return m_L == cube.getL () && m_W == cube.getW () && m_H == cube.getH (); } private : int m_L; int m_W; int m_H; }; bool isEqual (Cube& cube1, Cube& cube2) return cube1.getL () == cube2.getL () && cube1.getW () == cube2.getW () && cube1.getH () == cube2.getH (); } int main () Cube cube; cube.setL (10 ); cube.setW (20 ); cube.setH (30 ); cout << "面积:" << cube.getArea () << endl; cout << "体积:" << cube.getVolume () << endl; Cube cube2; cube2.setL (10 ); cube2.setW (20 ); cube2.setH (30 ); cout << "第二个长方体的长宽高:" << cube2.getL () << " " << cube2.getW () << " " << cube2.getH () << endl; if (cube.isEqualByClass (cube2)) { cout << "利用成员函数判断,两个长方体相等" << endl; } else { cout << "利用成员函数判断,两个长方体不相等" << endl; } if (isEqual (cube, cube2)) { cout << "利用全局函数判断,两个长方体相等" << endl; } else { cout << "利用全局函数判断,两个长方体不相等" << endl; } return 0 ; }
输出:
1
2
3
4
5
面积:2200 体积:6000 第二个长方体的长宽高:10 20 30 利用成员函数判断,两个长方体相等 利用全局函数判断,两个长方体相等
2 对象的初始化和清理
生活中我们买的电子产品都基本会有出厂设置,在某一天我们不用时候也会删除一些自己信息数据保证安全。
C++中的面向对象来源于生活,每个对象也都会有初始设置以及 对象销毁前的清理数据的设置。
2.1 构造函数和析构函数
一个对象或者变量没有初始状态,对其使用后果是未知。
同样的使用完一个对象或变量,没有及时清理,也会造成一定的安全问题。
构造函数 :主要作用在于创建对象时为对象的成员属性赋值,构造函数由编译器自动调用,无须手动调用。
构造函数语法: 类名(){}
构造函数,没有返回值也不写void
函数名称与类名相同
构造函数可以有参数,因此可以发生重载
程序在调用对象时候会自动调用构造,无须手动调用,而且只会调用一次
析构函数 :主要作用在于对象销毁前 系统自动调用,执行一些清理工作。
析构函数语法: ~类名(){}
析构函数,没有返回值也不写void
函数名称与类名相同,在名称前加上符号 ~
析构函数不可以有参数,因此不可以发生重载
程序在对象销毁前会自动调用析构,无须手动调用,而且只会调用一次
1 2 3 4 5 6 7 8 9 10 11 12 13 14 15 16 17 18 19 20 21 22 23 24 25 26 27 28 29 30 31 32 33 34 35 36 37 38 39 #include <iostream> using namespace std;class Person { public : Person () { cout << "Person的构造函数调用" << endl; } ~Person () { cout << "Person的析构函数调用" << endl; } }; void test01 () Person p; } int main () test01 (); return 0 ; }
输出:
1
2
Person的构造函数调用 Person的析构函数调用
2.2 构造函数的分类及调用 两种分类方式:
按参数分为: 有参构造和无参构造。
按类型分为: 普通构造和拷贝构造。
三种调用方式:
括号法。
显示法。
隐式转换法。
示例:
1 2 3 4 5 6 7 8 9 10 11 12 13 14 15 16 17 18 19 20 21 22 23 24 25 26 27 28 29 30 31 32 33 34 35 36 37 38 39 40 41 42 43 44 45 46 47 48 49 50 51 52 53 54 55 56 57 58 59 60 61 62 63 64 65 #include <iostream> using namespace std;class Person {public : Person () { cout << "无参构造函数!" << endl; } Person (int a) { age = a; cout << "有参构造函数!" << endl; } Person (const Person& p) { age = p.age; cout << "拷贝构造函数!" << endl; } ~Person () { cout << "析构函数!" << endl; } public : int age; }; void test01 () Person p; } void test02 () Person p1 (10 ) ; Person p2 = Person (10 ); Person p3 = Person (p2); Person p4 = 10 ; Person p5 = p4; } int main () test01 (); return 0 ; }
2.3 拷贝构造函数调用时机 C++中拷贝构造函数调用时机通常有三种情况:
使用一个已经创建完毕的对象来初始化一个新对象。
值传递的方式给函数参数传值。
以值方式返回局部对象。
示例:
1 2 3 4 5 6 7 8 9 10 11 12 13 14 15 16 17 18 19 20 21 22 23 24 25 26 27 28 29 30 31 32 33 34 35 36 37 38 39 40 41 42 43 44 45 46 47 48 49 50 51 52 53 54 55 56 57 58 59 60 61 62 63 64 65 66 #include <iostream> using namespace std;class Person {public : Person () { cout << "无参构造函数!" << endl; mAge = 0 ; } Person (int age) { cout << "有参构造函数!" << endl; mAge = age; } Person (const Person& p) { cout << "拷贝构造函数!" << endl; mAge = p.mAge; } ~Person () { cout << "析构函数!" << endl; } public : int mAge; }; void test01 () Person p1 (20 ) ; Person p2 (p1) ; cout << "p2的年龄为:" << p2.mAge << endl; } void doWork (Person p1) void test02 () Person p; doWork (p); } Person doWork2 () Person p1; cout << (int *)&p1 << endl; return Person (p1); } void test03 () Person p = doWork2 (); cout << (int *)&p << endl; } int main () test03 (); return 0 ; }
函数test01()输出:使用一个已经创建完毕的对象来初始化一个新对象
1
2
3
4
5
有参构造函数! 拷贝构造函数! p2的年龄为:20 析构函数! 析构函数!
函数test02()输出:值传递的方式给函数参数传值
1
2
3
4
无参构造函数! 拷贝构造函数! 析构函数! 析构函数!
函数test03()输出:以值方式返回局部对象
1
2
3
4
5
6
无参构造函数! 0x704bdffadc 拷贝构造函数! 析构函数! 0x704bdffb2c 析构函数!
2.4 构造函数调用规则 默认情况下,c++编译器至少给一个类添加3个函数:
1.默认构造函数(无参,函数体为空)。
2.默认析构函数(无参,函数体为空)。
3.默认拷贝构造函数,对属性进行值拷贝。
构造函数调用规则如下:
示例:
1 2 3 4 5 6 7 8 9 10 11 12 13 14 15 16 17 18 19 20 21 22 23 24 25 26 27 28 29 30 31 32 33 34 35 36 37 38 39 40 41 42 43 44 45 46 47 48 49 50 51 52 53 54 55 #include <iostream> using namespace std;class Person {public : Person () { cout << "无参构造函数!" << endl; } Person (int a) { age = a; cout << "有参构造函数!" << endl; } Person (const Person& p) { age = p.age; cout << "拷贝构造函数!" << endl; } ~Person () { cout << "析构函数!" << endl; } public : int age; }; void test01 () Person p1 (18 ) ; Person p2 (p1) ; cout << "p2的年龄为: " << p2.age << endl; } void test02 () Person p1; Person p2 (10 ) ; Person p3 (p2) ; Person p4; Person p5 (10 ) ; Person p6 (p5) ; } int main () test01 (); return 0 ; }
2.5 深拷贝与浅拷贝
浅拷贝:简单的赋值拷贝操作。
深拷贝:在堆区重新申请空间,进行拷贝操作。
示例:
1 2 3 4 5 6 7 8 9 10 11 12 13 14 15 16 17 18 19 20 21 22 23 24 25 26 27 28 29 30 31 32 33 34 35 36 37 38 39 40 41 42 43 44 45 46 47 48 49 50 51 52 53 54 55 56 57 #include <iostream> using namespace std;class Person {public : Person () { cout << "无参构造函数!" << endl; } Person (int age ,int height) { cout << "有参构造函数!" << endl; m_age = age; m_height = new int (height); } Person (const Person& p) { cout << "拷贝构造函数!" << endl; m_age = p.m_age; m_height = new int (*p.m_height); } ~Person () { cout << "析构函数!" << endl; if (m_height != NULL ) { delete m_height; m_height = NULL ; } } public : int m_age; int * m_height; }; void test01 () Person p1 (18 , 180 ) ; Person p2 (p1) ; cout << "p1的年龄: " << p1.m_age << " 身高: " << *p1.m_height << endl; cout << "p2的年龄: " << p2.m_age << " 身高: " << *p2.m_height << endl; } int main () test01 (); return 0 ; }
输出:
1
2
3
4
5
6
有参构造函数! 拷贝构造函数! p1的年龄: 18 身高: 180 p2的年龄: 18 身高: 180 析构函数! 析构函数!
总结:如果属性有在堆区开辟的,一定要自己提供拷贝构造函数,防止浅拷贝带来的问题。
2.6 初始化列表 作用:
C++提供了初始化列表语法,用来初始化属性。
语法: 构造函数():属性1(值1),属性2(值2)... {}
示例:
1 2 3 4 5 6 7 8 9 10 11 12 13 14 15 16 17 18 19 20 21 22 23 24 25 26 27 28 29 30 31 32 33 #include <iostream> using namespace std;class Person {public : Person (int a, int b, int c) :m_A (a), m_B (b), m_C (c) {} void PrintPerson () cout << "mA:" << m_A << endl; cout << "mB:" << m_B << endl; cout << "mC:" << m_C << endl; } private : int m_A; int m_B; int m_C; }; int main () Person p (1 , 2 , 3 ) ; p.PrintPerson (); return 0 ; }
2.7 类对象作为类成员 C++类中的成员可以是另一个类的对象,我们称该成员为对象成员 。
例如:
1
2
3
4
5
class A {}class B { A a; }
B类中有对象A作为成员,A为对象成员。
那么当创建B对象时,A与B的构造和析构的顺序是谁先谁后?
示例:
1 2 3 4 5 6 7 8 9 10 11 12 13 14 15 16 17 18 19 20 21 22 23 24 25 26 27 28 29 30 31 32 33 34 35 36 37 38 39 40 41 42 43 44 45 46 47 48 49 50 51 52 53 54 55 56 57 58 59 60 61 62 63 64 65 #include <iostream> #include <string> using namespace std;class Phone { public : Phone (string name) { m_PhoneName = name; cout << "Phone构造" << endl; } ~Phone () { cout << "Phone析构" << endl; } string m_PhoneName; }; class Person { public : Person (string name, string pName) :m_Name (name), m_Phone (pName) { cout << "Person构造" << endl; } ~Person () { cout << "Person析构" << endl; } void playGame () { cout << m_Name << " 使用" << m_Phone.m_PhoneName << " 牌手机! " << endl; } string m_Name; Phone m_Phone; }; void test01 () Person p ("张三" , "苹果X" ) ; p.playGame (); } int main () test01 (); return 0 ; }
输出:
1
2
3
4
5
Phone构造 Person构造 张三 使用苹果X 牌手机! Person析构 Phone析构
总结:构造的顺序是 :先调用对象成员的构造,再调用本类构造。析构顺序与构造相反。
2.8 静态成员 静态成员就是在成员变量和成员函数前加上关键字static,称为静态成员。
静态成员分为:
静态成员变量
所有对象共享同一份数据。
在编译阶段分配内存。
类内声明,类外初始化。
静态成员函数
所有对象共享同一个函数。
静态成员函数只能访问静态成员变量。
示例1 : 静态成员变量
1 2 3 4 5 6 7 8 9 10 11 12 13 14 15 16 17 18 19 20 21 22 23 24 25 26 27 28 29 30 31 32 33 34 35 36 37 38 39 40 41 42 43 44 45 46 47 48 49 #include <iostream> using namespace std;class Person { public : static int m_A; private : static int m_B; }; int Person::m_A = 10 ;int Person::m_B = 10 ;void test01 () Person p1; p1.m_A = 100 ; cout << "p1.m_A = " << p1.m_A << endl; Person p2; p2.m_A = 200 ; cout << "p1.m_A = " << p1.m_A << endl; cout << "p2.m_A = " << p2.m_A << endl; cout << "m_A = " << Person::m_A << endl; } int main () test01 (); return 0 ; }
输出:
1
2
3
4
p1.m_A = 100 p1.m_A = 200 p2.m_A = 200 m_A = 200
示例2: 静态成员函数
1 2 3 4 5 6 7 8 9 10 11 12 13 14 15 16 17 18 19 20 21 22 23 24 25 26 27 28 29 30 31 32 33 34 35 36 37 38 39 40 41 42 43 44 45 46 47 48 49 50 51 52 53 #include <iostream> using namespace std;class Person { public : static void func () { cout << "func调用" << endl; m_A = 100 ; } static int m_A; int m_B; private : static void func2 () { cout << "func2调用" << endl; } }; int Person::m_A = 10 ;void test01 () Person p1; p1.func (); cout << p1.m_A << endl; Person::func (); } int main () test01 (); return 0 ; }
输出:
3 C++对象模型和this指针 3.1 成员变量和成员函数分开存储 在C++中,类内的成员变量和成员函数分开存储,只有非静态成员变量才属于类的对象上。
示例:
1 2 3 4 5 6 7 8 9 10 11 12 13 14 15 16 17 18 19 20 21 22 23 24 25 26 27 28 29 30 31 32 33 #include <iostream> using namespace std;class Person {public : Person () { mA = 0 ; } int mA; static int mB; void func () cout << "mA:" << this ->mA << endl; } static void sfunc () } }; int main () cout << sizeof (Person) << endl; return 0 ; }
输出:
3.2 this指针概念 通过3.1我们知道在C++中成员变量和成员函数是分开存储的,每一个非静态成员函数只会诞生一份函数实例,也就是说多个同类型的对象会共用一块代码。
那么问题是:这一块代码是如何区分那个对象调用自己的呢?
c++通过提供特殊的对象指针,this指针,解决上述问题。this指针指向被调用的成员函数所属的对象 。
this指针的用途:
当形参和成员变量同名时,可用this指针来区分。
在类的非静态成员函数中返回对象本身,可使用return *this。
1 2 3 4 5 6 7 8 9 10 11 12 13 14 15 16 17 18 19 20 21 22 23 24 25 26 27 28 29 30 31 32 33 34 35 36 37 38 39 40 41 #include <iostream> using namespace std;class Person { public : Person (int age) { this ->age = age; } Person& PersonAddPerson (Person p) { this ->age += p.age; return *this ; } int age; }; void test01 () Person p1 (10 ) ; cout << "p1.age = " << p1.age << endl; Person p2 (10 ) ; p2.PersonAddPerson (p1).PersonAddPerson (p1).PersonAddPerson (p1); cout << "p2.age = " << p2.age << endl; } int main () test01 (); return 0 ; }
输出:
3.3 空指针访问成员函数 C++中空指针也是可以调用成员函数 的,但是也要注意有没有用到this指针,如果用到this指针,需要加以判断保证代码的健壮性。
示例:
1 2 3 4 5 6 7 8 9 10 11 12 13 14 15 16 17 18 19 20 21 22 23 24 25 26 27 28 29 30 31 32 33 34 35 36 37 #include <iostream> using namespace std;class Person {public : void ShowClassName () cout << "我是Person类!" << endl; } void ShowPerson () if (this == NULL ) { return ; } cout << mAge << endl; } public : int mAge; }; void test01 () Person * p = NULL ; p->ShowClassName (); p->ShowPerson (); } int main () test01 (); return 0 ; }
输出:
3.4 const修饰成员函数 常函数:
成员函数后加const后我们称为这个函数为常函数 。
常函数内不可以修改成员属性。
成员属性声明时加关键字mutable 后,在常函数中依然可以修改。
常对象:
声明对象前加const称该对象为常对象。
常对象只能调用常函数。
示例:
1 2 3 4 5 6 7 8 9 10 11 12 13 14 15 16 17 18 19 20 21 22 23 24 25 26 27 28 29 30 31 32 33 34 35 36 37 38 39 40 41 42 43 44 45 46 47 48 49 50 51 52 53 #include <iostream> using namespace std;class Person {public : Person () { m_A = 0 ; m_B = 0 ; } void ShowPerson () const this ->m_B = 100 ; } void MyFunc () } public : int m_A; mutable int m_B; }; void test01 () const Person person; cout << person.m_A << endl; person.m_B = 20 ; cout << person.m_B << endl; person.ShowPerson (); } int main () test01 (); return 0 ; }
输出:
4 友元 生活中你的家有客厅(Public),有你的卧室(Private)。客厅所有来的客人都可以进去,但是你的卧室是私有的,也就是说只有你能进去。但是呢,你也可以允许你的好闺蜜好基友进去。
在程序里,有些私有属性也想让类外特殊的一些函数或者类进行访问 ,就需要用到友元的技术。
友元的目的就是让一个函数或者类访问另一个类中私有成员。
友元的关键字为 friend
友元的三种实现:
4.1 全局函数做友元 示例:
1 2 3 4 5 6 7 8 9 10 11 12 13 14 15 16 17 18 19 20 21 22 23 24 25 26 27 28 29 30 31 32 33 34 35 36 37 38 39 40 41 42 43 44 45 46 #include <iostream> #include <string> using namespace std;class Building { friend void goodGay (Building * building) public : Building () { this ->m_SittingRoom = "客厅" ; this ->m_BedRoom = "卧室" ; } public : string m_SittingRoom; private : string m_BedRoom; }; void goodGay (Building * building) cout << "好基友正在访问: " << building->m_SittingRoom << endl; cout << "好基友正在访问: " << building->m_BedRoom << endl; } void test01 () Building b; goodGay (&b); } int main () test01 (); return 0 ; }
本例中,goodGay()全局函数是Building类的好朋友,可以访问类中的私有内容。
输出:
4.2 类做友元 示例:
1 2 3 4 5 6 7 8 9 10 11 12 13 14 15 16 17 18 19 20 21 22 23 24 25 26 27 28 29 30 31 32 33 34 35 36 37 38 39 40 41 42 43 44 45 46 47 48 49 50 51 52 53 54 55 56 57 58 59 60 61 62 #include <iostream> #include <string> using namespace std;class Building ;class goodGay { public : goodGay (); void visit () private : Building *building; }; class Building { friend class goodGay ; public : Building (); public : string m_SittingRoom; private : string m_BedRoom; }; Building::Building () { this ->m_SittingRoom = "客厅" ; this ->m_BedRoom = "卧室" ; } goodGay::goodGay () { building = new Building; } void goodGay::visit () cout << "好基友类正在访问" << building->m_SittingRoom << endl; cout << "好基友类正在访问" << building->m_BedRoom << endl; } void test01 () goodGay gg; gg.visit (); } int main () test01 (); return 0 ; }
本例中,goodGay类是Building类的好朋友,可以访问到Building类中私有内容。
输出:
4.3 成员函数做友元 示例:
1 2 3 4 5 6 7 8 9 10 11 12 13 14 15 16 17 18 19 20 21 22 23 24 25 26 27 28 29 30 31 32 33 34 35 36 37 38 39 40 41 42 43 44 45 46 47 48 49 50 51 52 53 54 55 56 57 58 59 60 61 62 63 64 65 66 67 68 69 70 #include <iostream> #include <string> using namespace std;class Building ;class goodGay { public : goodGay (); void visit () void visit2 () private : Building *building; }; class Building { friend void goodGay::visit () public : Building (); public : string m_SittingRoom; private : string m_BedRoom; }; Building::Building () { this ->m_SittingRoom = "客厅" ; this ->m_BedRoom = "卧室" ; } goodGay::goodGay () { building = new Building; } void goodGay::visit () cout << "visit正在访问" << building->m_SittingRoom << endl; cout << "visit正在访问" << building->m_BedRoom << endl; } void goodGay::visit2 () cout << "visit2正在访问" << building->m_SittingRoom << endl; } void test01 () goodGay gg; gg.visit (); gg.visit2 (); } int main () test01 (); return 0 ; }
本例中,goodGay类中的visit成员函数是Building好朋友,可以访问私有内容。
输出:
1 2 3 visit正在访问客厅 visit正在访问卧室 visit2正在访问客厅
5 运算符重载 运算符重载概念:对已有的运算符重新进行定义,赋予其另一种功能,以适应不同的数据类型。
5.1 加号运算符重载 作用:实现两个自定义数据类型相加的运算。
示例:
1 2 3 4 5 6 7 8 9 10 11 12 13 14 15 16 17 18 19 20 21 22 23 24 25 26 27 28 29 30 31 32 33 34 35 36 37 38 39 40 41 42 43 44 45 46 47 48 49 50 51 52 53 54 55 56 57 58 59 60 61 62 63 #include <iostream> using namespace std;class Person {public : Person () {}; Person (int a, int b) { this ->m_A = a; this ->m_B = b; } Person operator +(const Person& p) { Person temp; temp.m_A = this ->m_A + p.m_A; temp.m_B = this ->m_B + p.m_B; return temp; } public : int m_A; int m_B; }; Person operator +(const Person& p2, int val) { Person temp; temp.m_A = p2.m_A + val; temp.m_B = p2.m_B + val; return temp; } void test () Person p1 (10 , 10 ) ; Person p2 (20 , 20 ) ; Person p3 = p2 + p1; cout << "mA:" << p3.m_A << " mB:" << p3.m_B << endl; Person p4 = p3 + 10 ; cout << "mA:" << p4.m_A << " mB:" << p4.m_B << endl; } int main () test (); return 0 ; }
输出:
总结1:对于内置的数据类型的表达式的的运算符是不可能改变的。
总结2:不要滥用运算符重载。
5.2 左移运算符重载 作用:可以输出自定义数据类型。
示例:
1 2 3 4 5 6 7 8 9 10 11 12 13 14 15 16 17 18 19 20 21 22 23 24 25 26 27 28 29 30 31 32 33 34 35 36 37 38 39 40 41 42 43 44 45 #include <iostream> using namespace std;class Person { friend ostream& operator <<(ostream& out, Person& p); public : Person (int a, int b) { this ->m_A = a; this ->m_B = b; } private : int m_A; int m_B; }; ostream& operator <<(ostream& out, Person& p) { out << "a:" << p.m_A << " b:" << p.m_B; return out; } void test () Person p1 (10 , 20 ) ; cout << p1 << " hello world" << endl; } int main () test (); return 0 ; }
输出:
总结:重载左移运算符配合友元可以实现输出自定义数据类型。
5.3 递增运算符重载 作用: 通过重载递增运算符,实现自己的整型数据。
示例:
1 2 3 4 5 6 7 8 9 10 11 12 13 14 15 16 17 18 19 20 21 22 23 24 25 26 27 28 29 30 31 32 33 34 35 36 37 38 39 40 41 42 43 44 45 46 47 48 49 50 51 52 53 54 55 56 57 58 59 60 61 62 #include <iostream> using namespace std;class MyInteger { friend ostream& operator <<(ostream& out, MyInteger myint); public : MyInteger () { m_Num = 0 ; } MyInteger& operator ++() { m_Num++; return *this ; } MyInteger operator ++(int ) { MyInteger temp = *this ; m_Num++; return temp; } private : int m_Num; }; ostream& operator <<(ostream& out, MyInteger myint) { out << myint.m_Num; return out; } void test01 () MyInteger myInt; cout << ++myInt << endl; cout << myInt << endl; } void test02 () MyInteger myInt; cout << myInt++ << endl; cout << myInt << endl; } int main () test01 (); test02 (); return 0 ; }
输出:
总结: 前置递增返回引用,后置递增返回值。
5.4 赋值运算符重载 c++编译器至少给一个类添加4个函数:
默认构造函数(无参,函数体为空)。
默认析构函数(无参,函数体为空)。
默认拷贝构造函数,对属性进行值拷贝。
赋值运算符 operator=,对属性进行值拷贝。
如果类中有属性指向堆区,做赋值操作时也会出现深浅拷贝问题。
示例:
1 2 3 4 5 6 7 8 9 10 11 12 13 14 15 16 17 18 19 20 21 22 23 24 25 26 27 28 29 30 31 32 33 34 35 36 37 38 39 40 41 42 43 44 45 46 47 48 49 50 51 52 53 54 55 56 57 58 59 60 61 62 63 64 65 66 67 68 69 70 71 72 73 74 75 76 77 #include <iostream> using namespace std;class Person { public : Person (int age) { m_Age = new int (age); } Person& operator =(Person &p) { if (m_Age != NULL ) { delete m_Age; m_Age = NULL ; } m_Age = new int (*p.m_Age); return *this ; } ~Person () { if (m_Age != NULL ) { delete m_Age; m_Age = NULL ; } } int *m_Age; }; void test01 () Person p1 (18 ) ; Person p2 (20 ) ; Person p3 (30 ) ; p3 = p2 = p1; cout << "p1的年龄为:" << *p1.m_Age << endl; cout << "p2的年龄为:" << *p2.m_Age << endl; cout << "p3的年龄为:" << *p3.m_Age << endl; } int main () test01 (); return 0 ; }
输出:
1 2 3 p1的年龄为:18 p2的年龄为:18 p3的年龄为:18
5.5 关系运算符重载 作用: 重载关系运算符,可以让两个自定义类型对象进行对比操作。
示例:
1 2 3 4 5 6 7 8 9 10 11 12 13 14 15 16 17 18 19 20 21 22 23 24 25 26 27 28 29 30 31 32 33 34 35 36 37 38 39 40 41 42 43 44 45 46 47 48 49 50 51 52 53 54 55 56 57 58 59 60 61 62 63 64 65 66 67 68 69 70 71 72 73 74 #include <iostream> #include <string> using namespace std;class Person { public : Person (string name, int age) { this ->m_Name = name; this ->m_Age = age; }; bool operator ==(Person & p) { if (this ->m_Name == p.m_Name && this ->m_Age == p.m_Age) { return true ; } else { return false ; } } bool operator !=(Person & p) { if (this ->m_Name == p.m_Name && this ->m_Age == p.m_Age) { return false ; } else { return true ; } } string m_Name; int m_Age; }; void test01 () Person a ("孙悟空" , 18 ) ; Person b ("孙悟空" , 18 ) ; Person c ("猪八戒" , 28 ) ; if (a == b) { cout << "a和b相等" << endl; } else { cout << "a和b不相等" << endl; } if (a != c) { cout << "a和c不相等" << endl; } else { cout << "a和c相等" << endl; } } int main () test01 (); return 0 ; }
输出:
5.6 函数调用运算符重载
函数调用运算符 () 也可以重载。
由于重载后使用的方式非常像函数的调用,因此称为仿函数。
仿函数没有固定写法,非常灵活。
示例:
1 2 3 4 5 6 7 8 9 10 11 12 13 14 15 16 17 18 19 20 21 22 23 24 25 26 27 28 29 30 31 32 33 34 35 36 37 38 39 40 41 42 43 44 45 46 47 48 #include <iostream> #include <string> using namespace std;class MyPrint { public : void operator () (string text) { cout << text << endl; } }; void test01 () MyPrint myFunc; myFunc ("hello world" ); } class MyAdd { public : int operator () (int v1, int v2) { return v1 + v2; } }; void test02 () MyAdd add; int ret = add (10 , 10 ); cout << "ret = " << ret << endl; cout << "MyAdd()(100,100) = " << MyAdd ()(100 , 100 ) << endl; } int main () test01 (); test02 (); return 0 ; }
输出:
1 2 3 hello world ret = 20 MyAdd()(100,100) = 200
6 继承 继承是面向对象三大特性之一 。
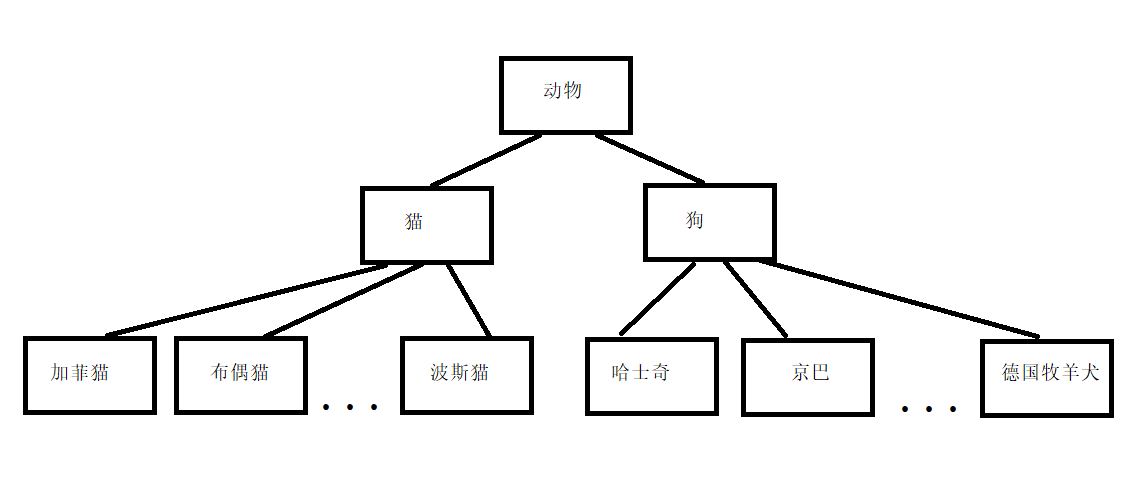
有些类与类之间存在特殊的关系,例如下图中:
我们发现,定义这些类时,下级别的成员除了拥有上一级的共性,还有自己的特性。
这个时候我们就可以考虑利用继承的技术,减少重复代码。
6.1 继承的基本语法 例如我们看到很多网站中,都有公共的头部,公共的底部,甚至公共的左侧列表,只有中心内容不同。
接下来我们分别利用普通写法和继承的写法来实现网页中的内容,看一下继承存在的意义以及好处。
普通实现:
1 2 3 4 5 6 7 8 9 10 11 12 13 14 15 16 17 18 19 20 21 22 23 24 25 26 27 28 29 30 31 32 33 34 35 36 37 38 39 40 41 42 43 44 45 46 47 48 49 50 51 52 53 54 55 56 57 58 59 60 61 62 63 64 65 66 67 68 69 70 71 72 73 74 75 76 77 78 79 80 81 82 83 84 85 86 87 88 89 90 91 92 93 94 95 96 97 98 99 100 101 102 103 #include <iostream> using namespace std;class Java { public : void header () { cout << "首页、公开课、登录、注册...(公共头部)" << endl; } void footer () { cout << "帮助中心、交流合作、站内地图...(公共底部)" << endl; } void left () { cout << "Java,Python,C++...(公共分类列表)" << endl; } void content () { cout << "JAVA学科视频" << endl; } }; class Python { public : void header () { cout << "首页、公开课、登录、注册...(公共头部)" << endl; } void footer () { cout << "帮助中心、交流合作、站内地图...(公共底部)" << endl; } void left () { cout << "Java,Python,C++...(公共分类列表)" << endl; } void content () { cout << "Python学科视频" << endl; } }; class CPP { public : void header () { cout << "首页、公开课、登录、注册...(公共头部)" << endl; } void footer () { cout << "帮助中心、交流合作、站内地图...(公共底部)" << endl; } void left () { cout << "Java,Python,C++...(公共分类列表)" << endl; } void content () { cout << "C++学科视频" << endl; } }; void test01 () cout << "Java下载视频页面如下: " << endl; Java ja; ja.header (); ja.footer (); ja.left (); ja.content (); cout << "--------------------" << endl; cout << "Python下载视频页面如下: " << endl; Python py; py.header (); py.footer (); py.left (); py.content (); cout << "--------------------" << endl; cout << "C++下载视频页面如下: " << endl; CPP cp; cp.header (); cp.footer (); cp.left (); cp.content (); } int main () test01 (); return 0 ; }
输出:
1 2 3 4 5 6 7 8 9 10 11 12 13 14 15 16 17 Java下载视频页面如下: 首页、公开课、登录、注册...(公共头部) 帮助中心、交流合作、站内地图...(公共底部) Java,Python,C++...(公共分类列表) JAVA学科视频 -------------------- Python下载视频页面如下: 首页、公开课、登录、注册...(公共头部) 帮助中心、交流合作、站内地图...(公共底部) Java,Python,C++...(公共分类列表) Python学科视频 -------------------- C++下载视频页面如下: 首页、公开课、登录、注册...(公共头部) 帮助中心、交流合作、站内地图...(公共底部) Java,Python,C++...(公共分类列表) C++学科视频
继承实现:
1 2 3 4 5 6 7 8 9 10 11 12 13 14 15 16 17 18 19 20 21 22 23 24 25 26 27 28 29 30 31 32 33 34 35 36 37 38 39 40 41 42 43 44 45 46 47 48 49 50 51 52 53 54 55 56 57 58 59 60 61 62 63 64 65 66 67 68 69 70 71 72 73 74 75 76 77 78 79 80 81 82 83 84 85 86 87 88 #include <iostream> using namespace std;class BasePage { public : void header () { cout << "首页、公开课、登录、注册...(公共头部)" << endl; } void footer () { cout << "帮助中心、交流合作、站内地图...(公共底部)" << endl; } void left () { cout << "Java,Python,C++...(公共分类列表)" << endl; } }; class Java : public BasePage{ public : void content () { cout << "JAVA学科视频" << endl; } }; class Python : public BasePage{ public : void content () { cout << "Python学科视频" << endl; } }; class CPP : public BasePage{ public : void content () { cout << "C++学科视频" << endl; } }; void test01 () cout << "Java下载视频页面如下: " << endl; Java ja; ja.header (); ja.footer (); ja.left (); ja.content (); cout << "--------------------" << endl; cout << "Python下载视频页面如下: " << endl; Python py; py.header (); py.footer (); py.left (); py.content (); cout << "--------------------" << endl; cout << "C++下载视频页面如下: " << endl; CPP cp; cp.header (); cp.footer (); cp.left (); cp.content (); } int main () test01 (); return 0 ; }
输出:
1 2 3 4 5 6 7 8 9 10 11 12 13 14 15 16 17 Java下载视频页面如下: 首页、公开课、登录、注册...(公共头部) 帮助中心、交流合作、站内地图...(公共底部) Java,Python,C++...(公共分类列表) JAVA学科视频 -------------------- Python下载视频页面如下: 首页、公开课、登录、注册...(公共头部) 帮助中心、交流合作、站内地图...(公共底部) Java,Python,C++...(公共分类列表) Python学科视频 -------------------- C++下载视频页面如下: 首页、公开课、登录、注册...(公共头部) 帮助中心、交流合作、站内地图...(公共底部) Java,Python,C++...(公共分类列表) C++学科视频
总结:
继承的好处:可以减少重复的代码 。
class A : public B; class 子类 : 继承方式 父类
A 类称为子类 或 派生类
B 类称为父类 或 基类
派生类中的成员,包含两大部分 :
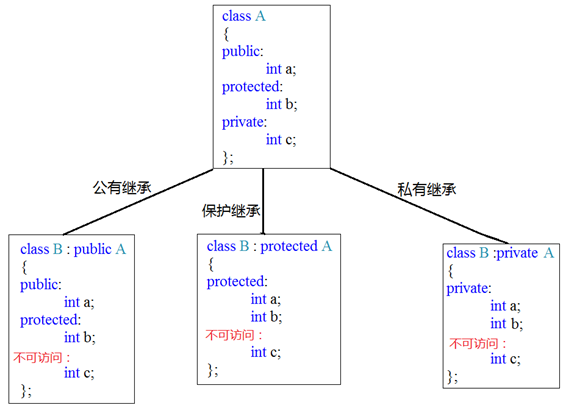
6.2 继承方式 继承的语法:class 子类 : 继承方式 父类
继承方式一共有三种:
公共继承:基类私有成员不可访问,保护成员和公有成员可以访问。
保护继承:基类私有成员不可访问,保护成员和公有成员可以访问,保护成员变为保护成员。
私有继承:基类私有成员不可访问,保护成员和公有成员可以访问,保护成员变为私有成员,公有成员变为私有成员。
公共继承:
1 2 3 4 5 6 7 8 9 10 11 12 13 14 15 16 17 18 19 20 21 22 23 24 25 26 27 28 29 class Base1 { public : int m_A; protected : int m_B; private : int m_C; }; class Son1 :public Base1{ public : void func () { m_A; m_B; } }; void test01 () Son1 s1; s1.m_A; }
保护继承:
1 2 3 4 5 6 7 8 9 10 11 12 13 14 15 16 17 18 19 20 21 22 23 24 25 26 27 class Base2 { public : int m_A; protected : int m_B; private : int m_C; }; class Son2 :protected Base2{ public : void func () { m_A; m_B; } }; void test02 () Son2 s; }
私有继承:
1 2 3 4 5 6 7 8 9 10 11 12 13 14 15 16 17 18 19 20 21 22 23 24 25 26 27 28 29 30 31 32 33 34 35 36 37 38 39 class Base3 { public : int m_A; protected : int m_B; private : int m_C; }; class Son3 :private Base3{ public : void func () { m_A; m_B; } }; void test03 () Son3 s; } class GrandSon3 :public Son3{ public : void func () { } };
6.3 继承中的对象模型 问题: 从父类继承过来的成员,哪些属于子类对象中?
示例:
1 2 3 4 5 6 7 8 9 10 11 12 13 14 15 16 17 18 19 20 21 22 23 24 25 26 27 28 29 30 31 #include <iostream> using namespace std;class Base { public : int m_A; protected : int m_B; private : int m_C; }; class Son :public Base{ public : int m_D; }; void test01 () cout << "sizeof Son = " << sizeof (Son) << endl; } int main () test01 (); return 0 ; }
输出:
结论: 父类中私有成员也是被子类继承下去了,只是由编译器给隐藏后访问不到
6.4 继承中构造和析构顺序 子类继承父类后,当创建子类对象,也会调用父类的构造函数。
问题:父类和子类的构造和析构顺序是谁先谁后?
示例:
1 2 3 4 5 6 7 8 9 10 11 12 13 14 15 16 17 18 19 20 21 22 23 24 25 26 27 28 29 30 31 32 33 34 35 36 37 38 39 40 41 42 43 #include <iostream> using namespace std;class Base { public : Base () { cout << "Base构造函数!" << endl; } ~Base () { cout << "Base析构函数!" << endl; } }; class Son : public Base{ public : Son () { cout << "Son构造函数!" << endl; } ~Son () { cout << "Son析构函数!" << endl; } }; void test01 () Son s; } int main () test01 (); return 0 ; }
输出:
1 2 3 4 Base构造函数! Son构造函数! Son析构函数! Base析构函数!
总结:继承中,先调用父类构造函数,再调用子类构造函数,析构顺序与构造相反。
6.5 继承同名成员处理方式 问题:当子类与父类出现同名的成员,如何通过子类对象,访问到子类或父类中同名的数据呢?
访问子类同名成员 直接访问即可。
访问父类同名成员 需要加作用域。
示例:
1 2 3 4 5 6 7 8 9 10 11 12 13 14 15 16 17 18 19 20 21 22 23 24 25 26 27 28 29 30 31 32 33 34 35 36 37 38 39 40 41 42 43 44 45 46 47 48 49 50 51 52 53 54 55 56 57 58 59 60 61 62 63 64 65 66 67 68 #include <iostream> using namespace std;class Base {public : Base () { m_A = 100 ; } void func () { cout << "Base - func()调用" << endl; } void func (int a) { cout << "Base - func(int a)调用" << endl; } public : int m_A; }; class Son : public Base {public : Son () { m_A = 200 ; } void func () { cout << "Son - func()调用" << endl; } public : int m_A; }; void test01 () Son s; cout << "Son下的m_A = " << s.m_A << endl; cout << "Base下的m_A = " << s.Base::m_A << endl; } void test02 () Son s; s.func (); s.Base::func (); s.Base::func (10 ); } int main () test01 (); test02 (); return 0 ; }
输出:
1 2 3 4 5 Son下的m_A = 200 Base下的m_A = 100 Son - func()调用 Base - func()调用 Base - func(int a)调用
总结:
子类对象可以直接访问到子类中同名成员。
子类对象加作用域可以访问到父类同名成员。
当子类与父类拥有同名的成员函数,子类会隐藏父类中同名成员函数,加作用域可以访问到父类中同名函数。
6.6 继承同名静态成员处理方式 问题:继承中同名的静态成员在子类对象上如何进行访问?
静态成员和非静态成员出现同名,处理方式一致。
访问子类同名成员 直接访问即可
访问父类同名成员 需要加作用域
示例:
1 2 3 4 5 6 7 8 9 10 11 12 13 14 15 16 17 18 19 20 21 22 23 24 25 26 27 28 29 30 31 32 33 34 35 36 37 38 39 40 41 42 43 44 45 46 47 48 49 50 51 52 53 54 55 56 57 58 59 60 61 62 63 64 65 66 67 68 69 70 #include <iostream> using namespace std;class Base {public : static void func () { cout << "Base - static void func()" << endl; } static void func (int a) { cout << "Base - static void func(int a)" << endl; } static int m_A; }; int Base::m_A = 100 ;class Son : public Base {public : static void func () { cout << "Son - static void func()" << endl; } static int m_A; }; int Son::m_A = 200 ;void test01 () cout << "通过对象访问: " << endl; Son s; cout << "Son 下 m_A = " << s.m_A << endl; cout << "Base 下 m_A = " << s.Base::m_A << endl; cout << "通过类名访问: " << endl; cout << "Son 下 m_A = " << Son::m_A << endl; cout << "Base 下 m_A = " << Son::Base::m_A << endl; } void test02 () cout << "通过对象访问: " << endl; Son s; s.func (); s.Base::func (); cout << "通过类名访问: " << endl; Son::func (); Son::Base::func (); Son::Base::func (100 ); } int main () test01 (); test02 (); return 0 ; }
输出:
1 2 3 4 5 6 7 8 9 10 11 12 13 通过对象访问: Son 下 m_A = 200 Base 下 m_A = 100 通过类名访问: Son 下 m_A = 200 Base 下 m_A = 100 通过对象访问: Son - static void func() Base - static void func() 通过类名访问: Son - static void func() Base - static void func() Base - static void func(int a)
总结:同名静态成员处理方式和非静态处理方式一样,只不过有两种访问的方式(通过对象 和 通过类名 )。
6.7 多继承语法 C++允许一个类继承多个类 。
语法: class 子类 :继承方式 父类1 , 继承方式 父类2...
多继承可能会引发父类中有同名成员出现,需要加作用域区分。
C++实际开发中不建议用多继承 。
示例:
1 2 3 4 5 6 7 8 9 10 11 12 13 14 15 16 17 18 19 20 21 22 23 24 25 26 27 28 29 30 31 32 33 34 35 36 37 38 39 40 41 42 43 44 45 46 47 48 49 50 51 52 53 54 55 #include <iostream> using namespace std;class Base1 {public : Base1 () { m_A = 100 ; } public : int m_A; }; class Base2 {public : Base2 () { m_A = 200 ; } public : int m_A; }; class Son : public Base2, public Base1 { public : Son () { m_C = 300 ; m_D = 400 ; } public : int m_C; int m_D; }; void test01 () Son s; cout << "sizeof Son = " << sizeof (s) << endl; cout << s.Base1::m_A << endl; cout << s.Base2::m_A << endl; } int main () test01 (); return 0 ; }
输出:
总结: 多继承中如果父类中出现了同名情况,子类使用时候要加作用域。
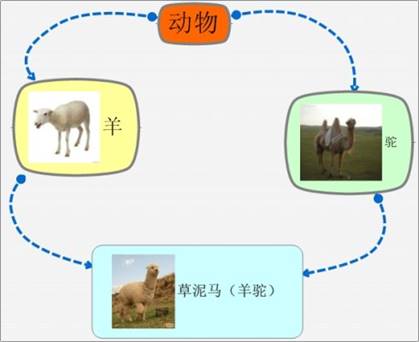
6.8 菱形继承 菱形继承概念:
两个派生类继承同一个基类。
又有某个类同时继承者两个派生类。
这种继承被称为菱形继承,或者钻石继承。
典型的菱形继承案例:
菱形继承问题:
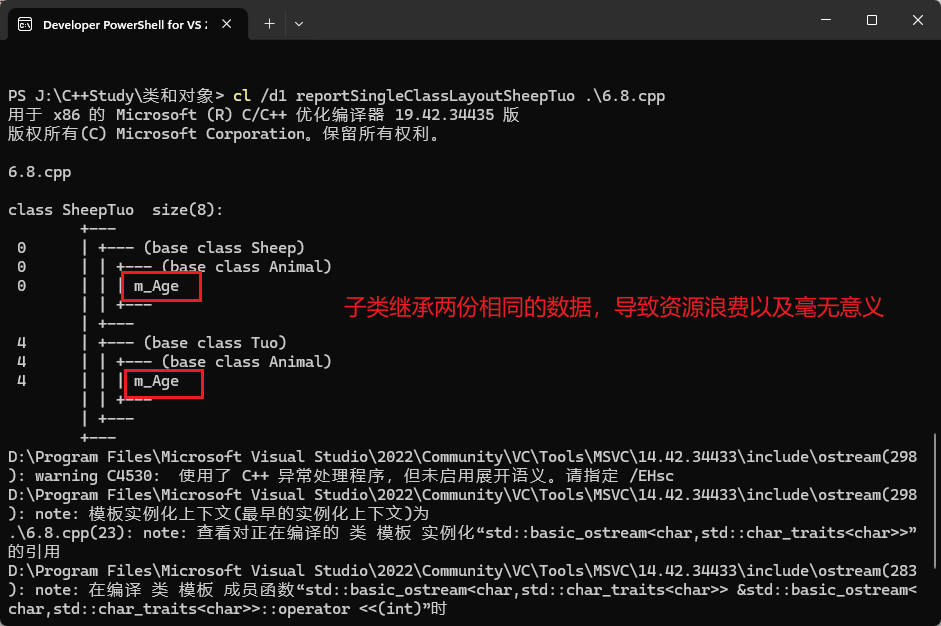
羊继承了动物的数据,驼同样继承了动物的数据,当草泥马使用数据时,就会产生二义性。
草泥马继承自动物的数据继承了两份,其实我们应该清楚,这份数据我们只需要一份就可以。
示例:
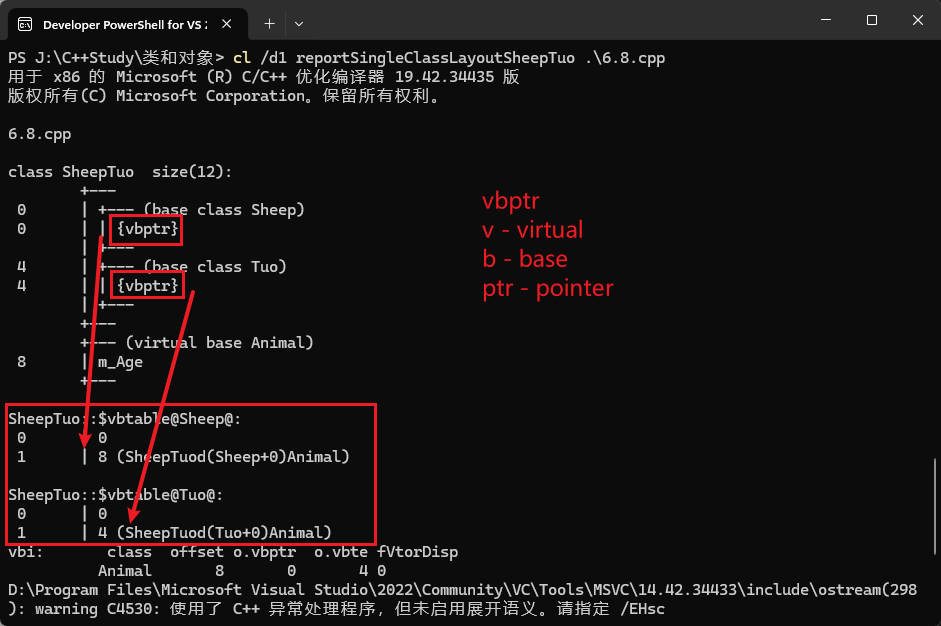
1 2 3 4 5 6 7 8 9 10 11 12 13 14 15 16 17 18 19 20 21 22 23 24 25 26 27 28 29 30 31 32 33 34 35 #include <iostream> using namespace std;class Animal { public : int m_Age; }; class Sheep : virtual public Animal {};class Tuo : virtual public Animal {};class SheepTuo : public Sheep, public Tuo {};void test01 () SheepTuo st; st.Sheep::m_Age = 18 ; st.Tuo::m_Age = 28 ; cout << "st.Sheep::m_Age = " << st.Sheep::m_Age << endl; cout << "st.Tuo::m_Age = " << st.Tuo::m_Age << endl; cout << "st.m_Age = " << st.m_Age << endl; } int main () test01 (); return 0 ; }
输出:
1 2 3 st.Sheep::m_Age = 28 st.Tuo::m_Age = 28 st.m_Age = 28
在未使用虚继承之前,如图所示,两个子类继承了两份相同的数据,导致资源浪费以及毫无意义。
在使用虚继承之后,如图所示,相同变量使用vbptr(虚基类指针)表示,该指针指向vbtable(虚基类表)。表中记录了变量的偏移量。两个子类中的vbptr均指向了相同的变量,因此该数据只有一个。
总结:
菱形继承带来的主要问题是子类继承两份相同的数据,导致资源浪费以及毫无意义。
利用虚继承可以解决菱形继承问题。
7 多态 7.1 多态的基本概念 多态是C++面向对象三大特性之一
多态分为两类
静态多态:函数重载 和运算符重载 属于静态多态,复用函数名。
动态多态:派生类和虚函数实现运行时多态。
静态多态和动态多态区别:
静态多态的函数地址早绑定 - 编译阶段确定函数地址。
动态多态的函数地址晚绑定 - 运行阶段确定函数地址。
案例:
1 2 3 4 5 6 7 8 9 10 11 12 13 14 15 16 17 18 19 20 21 22 23 24 25 26 27 28 29 30 31 32 33 34 35 36 37 38 39 40 41 42 43 44 45 46 47 48 49 50 51 52 53 54 55 56 57 58 59 60 61 62 63 64 #include <iostream> using namespace std;class Animal { public : virtual void speak () { cout << "动物在说话" << endl; } }; class Cat :public Animal{ public : void speak () { cout << "小猫在说话" << endl; } }; class Dog :public Animal{ public : void speak () { cout << "小狗在说话" << endl; } }; void DoSpeak (Animal & animal) animal.speak (); } void test01 () Cat cat; DoSpeak (cat); Dog dog; DoSpeak (dog); } int main () test01 (); return 0 ; }
输出:
总结:
多态满足条件:
多态使用条件:
重写:函数返回值类型、函数名、参数列表完全一致称为重写。
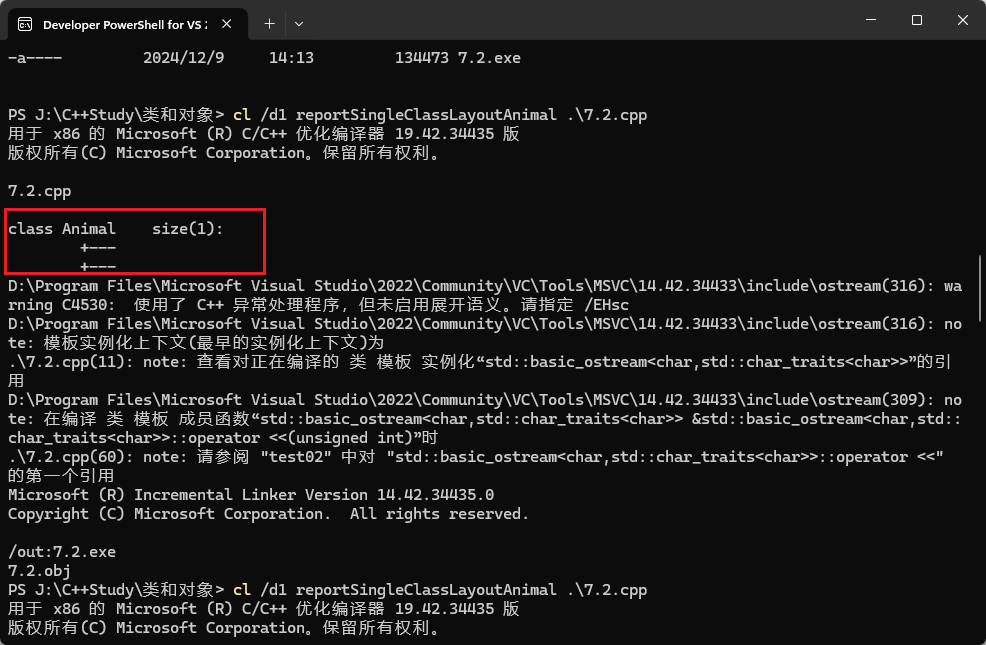
7.2 多态的原理剖析 在Animal类中,如果不使用virtual关键字让speak()函数作为虚函数的话,此时该类的结构如图,空类大小为1。
1 2 3 4 5 6 7 8 class Animal { public : void speak () { cout << "动物在说话" << endl; } };
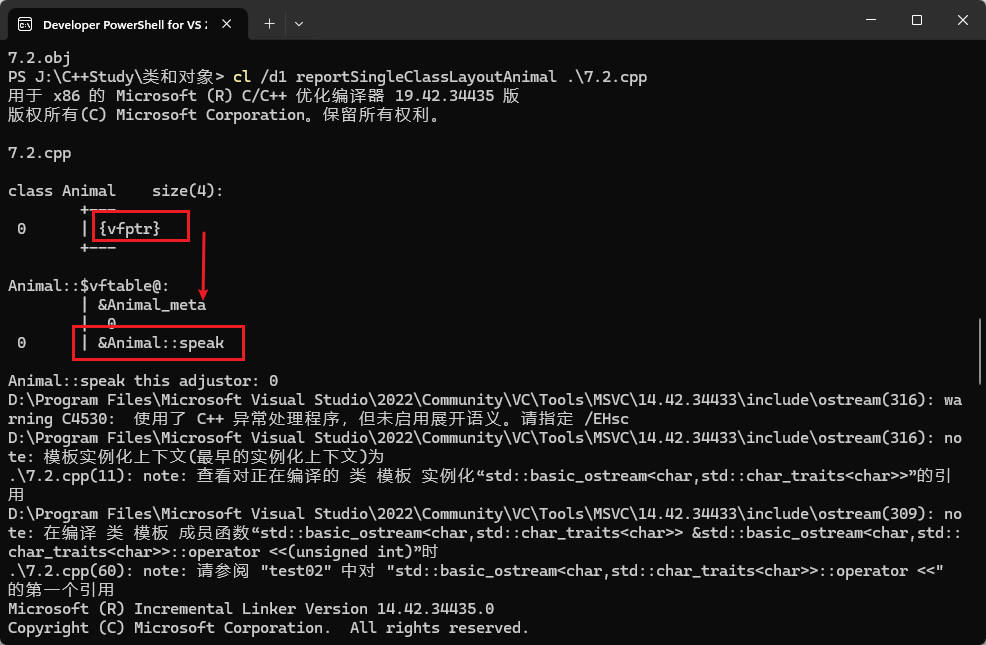
使用virtual关键字让speak()函数作为虚函数,此时该类的结构如图,类中为vfptr指针,该指针指向虚函数表。该表中记录函数的地址&Animal::speak。
1 2 3 4 5 6 7 8 9 10 class Animal { public : virtual void speak () { cout << "动物在说话" << endl; } };
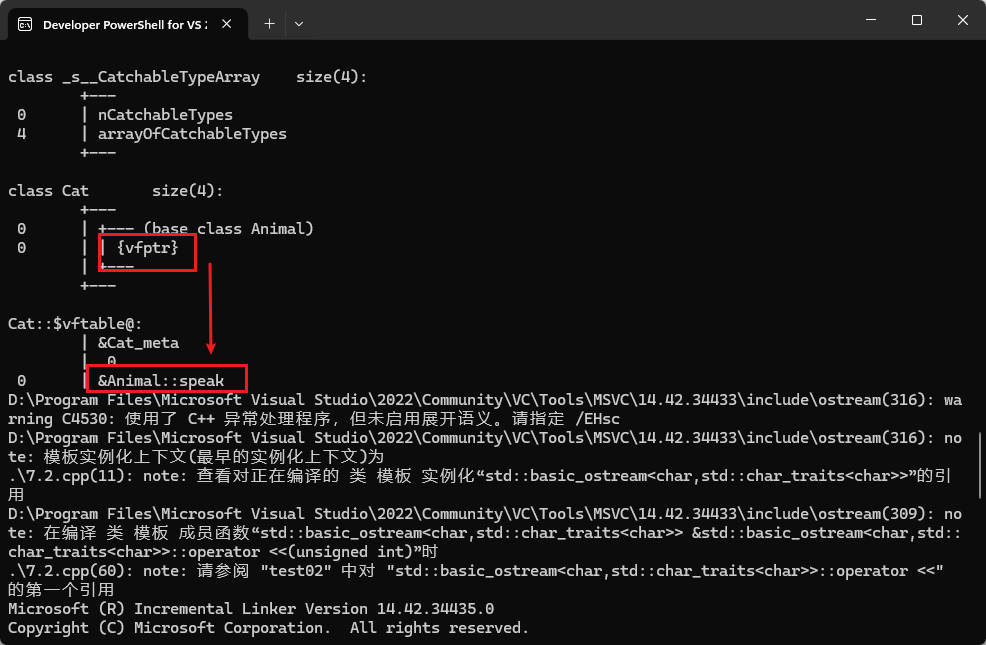
如果子类没有重写该函数时,子类继承了父类的vfptr指针,该指针指向虚函数表,该表中记录函数的地址&Animal::speak。
1 2 3 4 5 6 7 8 class Cat :public Animal{ public : };
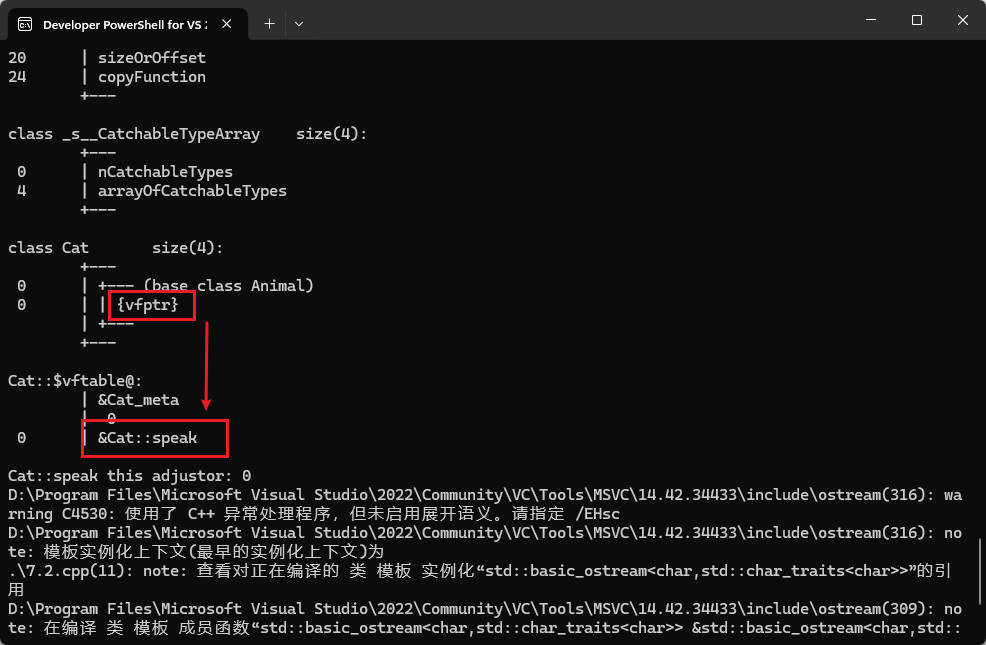
重写该函数之后,虚函数表中记录的数据会覆写父类的函数地址,变为&Cat::speak。从而实现多态。
1 2 3 4 5 6 7 8 class Cat :public Animal{ public : void speak () { cout << "小猫在说话" << endl; } };
7.3 多态案例(一)——计算器类 案例描述:
分别利用普通写法和多态技术,设计实现两个操作数进行运算的计算器类。
多态的优点:
代码组织结构清晰
可读性强
利于前期和后期的扩展以及维护
示例:
1 2 3 4 5 6 7 8 9 10 11 12 13 14 15 16 17 18 19 20 21 22 23 24 25 26 27 28 29 30 31 32 33 34 35 36 37 38 39 40 41 42 43 44 45 46 47 48 49 50 51 52 53 54 55 56 57 58 59 60 61 62 63 64 65 66 67 68 69 70 71 72 73 74 75 76 77 78 79 80 81 82 83 84 85 86 87 88 89 90 91 92 93 94 95 96 97 98 99 100 101 102 103 104 105 106 107 108 109 110 111 112 113 114 115 116 117 118 119 #include <iostream> #include <string> using namespace std;class Calculator {public : int getResult (string oper) { if (oper == "+" ) { return m_Num1 + m_Num2; } else if (oper == "-" ) { return m_Num1 - m_Num2; } else if (oper == "*" ) { return m_Num1 * m_Num2; } } public : int m_Num1; int m_Num2; }; void test01 () Calculator c; c.m_Num1 = 10 ; c.m_Num2 = 10 ; cout << c.m_Num1 << " + " << c.m_Num2 << " = " << c.getResult ("+" ) << endl; cout << c.m_Num1 << " - " << c.m_Num2 << " = " << c.getResult ("-" ) << endl; cout << c.m_Num1 << " * " << c.m_Num2 << " = " << c.getResult ("*" ) << endl; } class AbstractCalculator { public : virtual int getResult () { return 0 ; } int m_Num1; int m_Num2; }; class AddCalculator :public AbstractCalculator{ public : int getResult () { return m_Num1 + m_Num2; } }; class SubCalculator :public AbstractCalculator{ public : int getResult () { return m_Num1 - m_Num2; } }; class MulCalculator :public AbstractCalculator{ public : int getResult () { return m_Num1 * m_Num2; } }; void test02 () AbstractCalculator *abc = new AddCalculator; abc->m_Num1 = 10 ; abc->m_Num2 = 10 ; cout << abc->m_Num1 << " + " << abc->m_Num2 << " = " << abc->getResult () << endl; delete abc; abc = new SubCalculator; abc->m_Num1 = 10 ; abc->m_Num2 = 10 ; cout << abc->m_Num1 << " - " << abc->m_Num2 << " = " << abc->getResult () << endl; delete abc; abc = new MulCalculator; abc->m_Num1 = 10 ; abc->m_Num2 = 10 ; cout << abc->m_Num1 << " * " << abc->m_Num2 << " = " << abc->getResult () << endl; delete abc; } int main () test01 (); test02 (); return 0 ; }
输出:
1 2 3 4 5 6 10 + 10 = 20 10 - 10 = 0 10 * 10 = 100 10 + 10 = 20 10 - 10 = 0 10 * 10 = 100
总结:C++开发提倡利用多态设计程序架构,因为多态优点很多。
7.4 纯虚函数和抽象类 在多态中,通常父类中虚函数的实现是毫无意义的,主要都是调用子类重写的内容。因此可以将虚函数改为纯虚函数 。
当类中有了纯虚函数,这个类也称为抽象类 。
纯虚函数语法:virtual 返回值类型 函数名 (参数列表)= 0 ;
抽象类特点 :
无法实例化对象。
子类必须重写抽象类中的纯虚函数,否则也属于抽象类。
示例:
1 2 3 4 5 6 7 8 9 10 11 12 13 14 15 16 17 18 19 20 21 22 23 24 25 26 27 28 29 30 31 32 33 34 35 36 37 38 #include <iostream> using namespace std;class Base { public : virtual void func () 0 ; }; class Son :public Base{ public : virtual void func () { cout << "func调用" << endl; }; }; void test01 () Base * base = NULL ; base = new Son; base->func (); delete base; } int main () test01 (); return 0 ; }
输出:
7.5 多态案例(二)——制作饮品 案例描述:
制作饮品的大致流程为:煮水 - 冲泡 - 倒入杯中 - 加入辅料。
利用多态技术实现本案例,提供抽象制作饮品基类,提供子类制作咖啡和茶叶。
示例:
1 2 3 4 5 6 7 8 9 10 11 12 13 14 15 16 17 18 19 20 21 22 23 24 25 26 27 28 29 30 31 32 33 34 35 36 37 38 39 40 41 42 43 44 45 46 47 48 49 50 51 52 53 54 55 56 57 58 59 60 61 62 63 64 65 66 67 68 69 70 71 72 73 74 75 76 77 78 79 80 81 82 83 84 #include <iostream> using namespace std;class AbstractDrinking {public : virtual void Boil () 0 ; virtual void Brew () 0 ; virtual void PourInCup () 0 ; virtual void PutSomething () 0 ; void MakeDrink () Boil (); Brew (); PourInCup (); PutSomething (); } }; class Coffee : public AbstractDrinking {public : virtual void Boil () cout << "煮农夫山泉!" << endl; } virtual void Brew () cout << "冲泡咖啡!" << endl; } virtual void PourInCup () cout << "将咖啡倒入杯中!" << endl; } virtual void PutSomething () cout << "加入牛奶!" << endl; } }; class Tea : public AbstractDrinking {public : virtual void Boil () cout << "煮自来水!" << endl; } virtual void Brew () cout << "冲泡茶叶!" << endl; } virtual void PourInCup () cout << "将茶水倒入杯中!" << endl; } virtual void PutSomething () cout << "加入枸杞!" << endl; } }; void DoWork (AbstractDrinking* drink) drink->MakeDrink (); delete drink; } void test01 () DoWork (new Coffee); cout << "--------------" << endl; DoWork (new Tea); } int main () test01 (); return 0 ; }
输出:
1 2 3 4 5 6 7 8 9 煮农夫山泉! 冲泡咖啡! 将咖啡倒入杯中! 加入牛奶! -------------- 煮自来水! 冲泡茶叶! 将茶水倒入杯中! 加入枸杞!
7.6 虚析构和纯虚析构 多态使用时,如果子类中有属性开辟到堆区,那么父类指针在释放时无法调用到子类的析构代码。
解决方式:将父类中的析构函数改为虚析构 或者纯虚析构 。
虚析构和纯虚析构共性 :
可以解决父类指针释放子类对象。
都需要有具体的函数实现。
虚析构和纯虚析构区别 :
虚析构语法:
virtual ~类名(){}
纯虚析构语法:
virtual ~类名() = 0;
类名::~类名(){}
示例:
1 2 3 4 5 6 7 8 9 10 11 12 13 14 15 16 17 18 19 20 21 22 23 24 25 26 27 28 29 30 31 32 33 34 35 36 37 38 39 40 41 42 43 44 45 46 47 48 49 50 51 52 53 54 55 56 57 58 59 60 61 62 63 64 65 66 67 68 69 70 71 72 #include <iostream> #include <string> using namespace std;class Animal {public : Animal () { cout << "Animal 构造函数调用!" << endl; } virtual void Speak () 0 ; virtual ~Animal () = 0 ; }; Animal::~Animal () { cout << "Animal 纯虚析构函数调用!" << endl; } class Cat : public Animal {public : Cat (string name) { cout << "Cat构造函数调用!" << endl; m_Name = new string (name); } virtual void Speak () { cout << *m_Name << "小猫在说话!" << endl; } ~Cat () { cout << "Cat析构函数调用!" << endl; if (this ->m_Name != NULL ) { delete m_Name; m_Name = NULL ; } } public : string *m_Name; }; void test01 () Animal *animal = new Cat ("Tom" ); animal->Speak (); delete animal; } int main () test01 (); return 0 ; }
输出:
1 2 3 4 5 Animal 构造函数调用! Cat构造函数调用! Tom小猫在说话! Cat析构函数调用! Animal 纯虚析构函数调用!
总结:
1. 虚析构或纯虚析构就是用来解决通过父类指针释放子类对象。
2. 如果子类中没有堆区数据,可以不写为虚析构或纯虚析构。
3. 拥有纯虚析构函数的类也属于抽象类。
7.7 多态案例(三)——电脑组装 案例描述:
电脑主要组成部件为 CPU(用于计算),显卡(用于显示),内存条(用于存储)。将每个零件封装出抽象基类,并且提供不同的厂商生产不同的零件,例如Intel厂商和Lenovo厂商,创建电脑类 提供让电脑工作的函数,并且调用每个零件工作的接口 ,测试时组装三台不同的电脑进行工作。
示例:
1 2 3 4 5 6 7 8 9 10 11 12 13 14 15 16 17 18 19 20 21 22 23 24 25 26 27 28 29 30 31 32 33 34 35 36 37 38 39 40 41 42 43 44 45 46 47 48 49 50 51 52 53 54 55 56 57 58 59 60 61 62 63 64 65 66 67 68 69 70 71 72 73 74 75 76 77 78 79 80 81 82 83 84 85 86 87 88 89 90 91 92 93 94 95 96 97 98 99 100 101 102 103 104 105 106 107 108 109 110 111 112 113 114 115 116 117 118 119 120 121 122 123 124 125 126 127 128 129 130 131 132 133 134 135 136 137 138 139 140 141 142 143 144 145 146 147 148 149 150 151 152 153 154 155 156 157 158 159 160 161 162 163 164 165 166 167 168 169 170 171 172 173 174 175 #include <iostream> using namespace std;class CPU { public : virtual void calculate () 0 ; }; class VideoCard { public : virtual void display () 0 ; }; class Memory { public : virtual void storage () 0 ; }; class Computer { public : Computer (CPU * cpu, VideoCard * vc, Memory * mem) { m_cpu = cpu; m_vc = vc; m_mem = mem; } void work () { m_cpu->calculate (); m_vc->display (); m_mem->storage (); } ~Computer () { if (m_cpu != NULL ) { delete m_cpu; m_cpu = NULL ; } if (m_vc != NULL ) { delete m_vc; m_vc = NULL ; } if (m_mem != NULL ) { delete m_mem; m_mem = NULL ; } } private : CPU * m_cpu; VideoCard * m_vc; Memory * m_mem; }; class IntelCPU :public CPU{ public : virtual void calculate () { cout << "Intel的CPU开始计算了!" << endl; } }; class IntelVideoCard :public VideoCard{ public : virtual void display () { cout << "Intel的显卡开始显示了!" << endl; } }; class IntelMemory :public Memory{ public : virtual void storage () { cout << "Intel的内存条开始存储了!" << endl; } }; class LenovoCPU :public CPU{ public : virtual void calculate () { cout << "Lenovo的CPU开始计算了!" << endl; } }; class LenovoVideoCard :public VideoCard{ public : virtual void display () { cout << "Lenovo的显卡开始显示了!" << endl; } }; class LenovoMemory :public Memory{ public : virtual void storage () { cout << "Lenovo的内存条开始存储了!" << endl; } }; void test01 () CPU * intelCpu = new IntelCPU; VideoCard * intelCard = new IntelVideoCard; Memory * intelMem = new IntelMemory; cout << "第一台电脑开始工作:" << endl; Computer * computer1 = new Computer (intelCpu, intelCard, intelMem); computer1->work (); delete computer1; cout << "-----------------------" << endl; cout << "第二台电脑开始工作:" << endl; Computer * computer2 = new Computer (new LenovoCPU, new LenovoVideoCard, new LenovoMemory);; computer2->work (); delete computer2; cout << "-----------------------" << endl; cout << "第三台电脑开始工作:" << endl; Computer * computer3 = new Computer (new LenovoCPU, new IntelVideoCard, new LenovoMemory);; computer3->work (); delete computer3; } int main () test01 (); return 0 ; }
输出:
1 2 3 4 5 6 7 8 9 10 11 12 13 14 第一台电脑开始工作: Intel的CPU开始计算了! Intel的显卡开始显示了! Intel的内存条开始存储了! ----------------------- 第二台电脑开始工作: Lenovo的CPU开始计算了! Lenovo的显卡开始显示了! Lenovo的内存条开始存储了! ----------------------- 第三台电脑开始工作: Lenovo的CPU开始计算了! Intel的显卡开始显示了! Lenovo的内存条开始存储了!